Setting Up a Conference Bridge
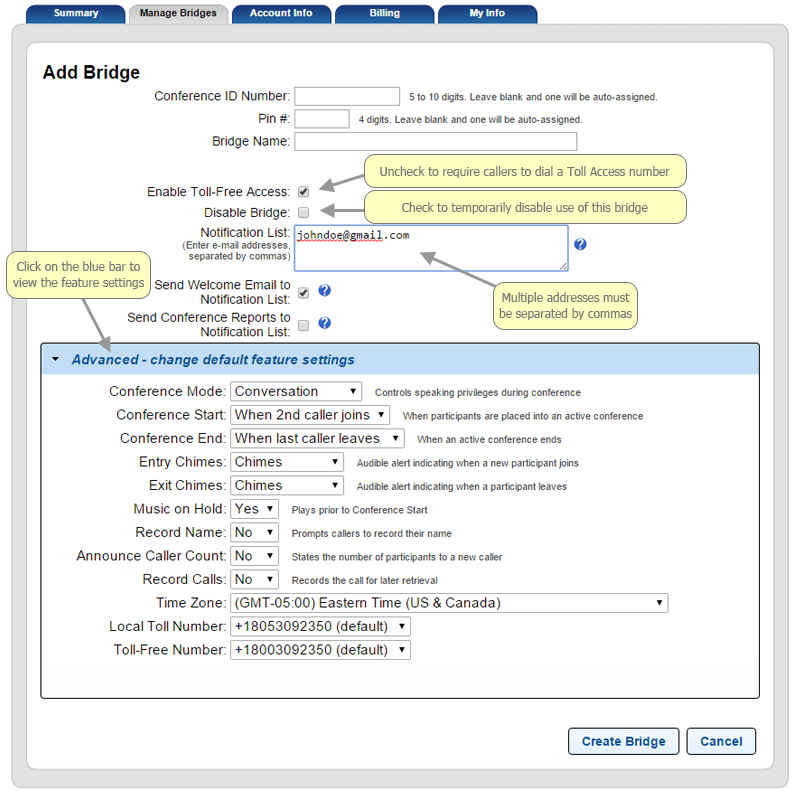
An Administrator can set up a new conference bridge by selecting the Manage Bridges tab in the Account Portal, then clicking on the Create New Bridge link displayed in the upper right corner. Clicking on this link brings up the Add Bridge page:
The conference bridge is activated instantly when the Create Bridge button is pressed, and immediately ready for use. Depending on your selected service plan, there may be a limit to the number of bridges you can activate on your account.
- Conference ID – This is the numeric code that callers will be prompted to enter to join your conference calls, which they will enter via the phone keypad. The code can be five to ten digits in length, and must be unique in the TurboBridge system. (Many common number sequences have been previously assigned.) If you leave this field blank, a random 7-digit code will be generated.
- Pin # – This numeric 4-digit Host PIN has two functions: (1) to designate a caller as a Host when joining a conference (providing access to Keypad Commands), and (2) to log into the Host Control Panel for this conference bridge.
To join a conference as Host, enter the Conference ID followed by the star key (*) instead of the pound key (#). You will then be prompted to enter the Host PIN. - Bridge Name – This optional field is a label associated with this bridge (e.g., department, project, or employee name), which is helpful if the account has multiple bridges. This name will be displayed in the “Welcome” email, post-conference email reports, and the Host Control Panel.
Hint: You may wish to append the Name with a department or tracking code, followed by a parsing character (such as an underscore) and the name – e.g., 12345_Operations. Since you can download call detail records, this can be useful for spreadsheet analysis or assigning costs to clients or departments.
- Enable Toll-Free Access – Unchecking this box will prevent callers from joining your conference calls by dialing a Toll-Free Access number (such as 1-800-309-2350), requiring them to use a Toll Access number (such as 1-774-450-9900). If you are enrolled in a flat-rate plan that includes unlimited Toll Access, you may wish to prohibit Toll-Free Access so that you do not incur extra per-minute charges.
- Disable Bridge – Check this box if you wish to temporarily disable access to the bridge. Unauthorized use of conference bridges is very rare, but you may wish to disable a bridge during a period of extended absence.
- Notification List – This list of email addresses (separate with commas if you enter multiple addresses) serves two purposes: (1) to receive the “Welcome” email containing the bridge information and instructions (along with any subsequent changes to the Conference ID or Host PIN), and (2) to receive post-conference email reports. Generally, these represent the Conference Hosts for this bridge. You may list up to ten email addresses in the Notification List.
The Notification List IS NOT to invite others to join your conference call. It is intended only for the distribution of information to the conference host.
- Send Welcome Email – If this box is checked, a host welcome email will be sent to the addresses in the Notification List. The email includes the Conference ID, Host PIN, assigned dial-in numbers, and instructions for using the service and accessing the Host Control Panel. If an Administrator changes the Conference ID or Host PIN, a “Bridge Has Changed” email will be sent to the Notification List.
- Send Conference Reports – If this box is checked, a report will be emailed to the Notification List after each conference call, listing the participants with arrival and departure times, plus a link to download the conference recording (if available).
To view and modify the default feature settings, click on the blue bar labeled Advanced – change default feature settings, which will then display the settings as shown in the screen image above. Every conference call begins with these feature settings, regardless of whether they were changed during the previous live conference. Either the Administrator (clicking on the Conference ID listed on the Manage Bridges tab in the Account Portal) or the Host (selecting the Settings tab in the Host Control Panel) may modify the default feature settings at any time. The options for each setting are described in the following table – the system default setting is * highlighted *:
Conference Mode
Controls the speaking privileges of the participants.
| Setting | Description |
|---|---|
| * Conversation * | All participants are un-muted. |
| Presentation | Non-hosts are muted and cannot un-mute themselves. |
| Question & Answer | Non-hosts start muted – can un-mute themselves by pressing *6 |
| Hosts Only | Non-hosts are placed on hold – hosts engage in private conversation. |
Conference Start
Specifies when the conference will begin. Prior to the conference start, participants are placed on hold.
| Setting | Description |
|---|---|
| * When 2nd caller joins * | No host required. Conference begins when 2nd caller arrives. |
| When host joins | Non-hosts placed on hold until first host arrives. |
| When host confirms | All callers remain on hold until a host begins the conference by pressing *3 |
Conference End
This setting only applies if a host participates in the conference.
| Setting | Description |
|---|---|
| * When last caller leaves * | |
| 1 minute after host leaves | Timer begins when last host departs. |
| 5 minutes after host leaves | |
| 15 minutes after host leaves | |
| 30 minutes after host leaves |
Entry Notice
You can specify audible alerts when participants join or leave your conferences.
| Setting | Description |
|---|---|
| * Chime * | Entry chime plays when new caller arrives. |
| Name | “John Doe just joined the conference.” |
| None | No audible alert when new caller arrives. |
Exit Notice
| Setting | Description |
|---|---|
| * Chime * | Exit chime plays when a caller departs. |
| Name | “John Doe just left the conference.” |
| None | No audible alert when a caller departs. |
Music on Hold
Note that any caller can turn off music-on-hold by pressing ** on the keypad.
| Setting | Description |
|---|---|
| * Yes * | Music plays while callers on hold – press ** to turn off |
| No | Silence while callers are on hold. |
Record Name
You must also specify the Name option for Entry and/or Exit Notice to play the recorded name into the conference. Alternatively, you can use the Host Control Panel to play the recorded name privately on your computer.
| Setting | Description |
|---|---|
| Yes | Callers are prompted to record their names upon arrival. |
| * No * | No prompt for recorded name. |
Announce Caller Count
Hosts will always hear a count of callers when joining the conference. This setting determines whether non-hosts will also hear that announcement.
| Setting | Description |
|---|---|
| Yes | Upon arrival, non-hosts are told how many callers are already in the conference. |
| * No * | Only hosts hear the number of callers that are already in the conference. |
Record Calls
You may record all your conferences by default with this setting.
| Setting | Description |
|---|---|
| Yes | All calls are automatically recorded – host can press *1 to stop recording. |
| * No * | Calls are not automatically recorded – host can press *1 to start recording. |
Additional Settings in Host Control Panel
The Settings page in the Host Control Panel allows you to activate additional features on your conference line. These settings are disabled by default. After you create a bridge, you can log into its corresponding Host Control Panel to enable these settings:
- Music on Hold – Preview and choose optional music selections.
- Participant Access – Restrict attendance by Caller ID phone number.
- Block Anonymous Callers – Require callers to unblock their Caller ID to join.
- Require User IDs – Assign unique codes to control participation.
- Recording Playback – Allow playback of conference recordings over the phone.